Linux Add a Swap File – HowTo

https://www.cyberciti.biz/faq/linux-add-a-swap-file-howto/

Procedure To Add a Swap File Under Linux

You need to use the dd command to create swap file. The mkswap command is used to set up a Linux swap area on a device or in a file.

Step #1: Login as the Root User

Open a terminal window (select Applications > Accessories > Terminal) or login to remote server using the ssh client. Switch to the root user by typing su - (or sudo -s) and entering the root password, when prompted:
$ su -
OR
$ sudo -s

Step #2: Create Storage File

Type the following command to create 512MB swap file (1024 * 512MB = 524288 block size):
# dd if=/dev/zero of=/swapfile1 bs=1024 count=524288
Sample outputs:

524288+0 records in
524288+0 records out
536870912 bytes (537 MB) copied, 3.23347 s, 166 MB/s

Where,

  1. if=/dev/zero : Read from /dev/zero file. /dev/zero is a special file in that provides as many null characters to build storage file called /swapfile1.
  2. of=/swapfile1 : Read from /dev/zero write storage file to /swapfile1.
  3. bs=1024 : Read and write 1024 BYTES bytes at a time.
  4. count=524288 : Copy only 523288 BLOCKS input blocks.

Step #3: Secure swap file

Setup correct file permission for security reasons, enter:
# chown root:root /swapfile1
# chmod 0600 /swapfile1

A world-readable swap file is a huge local vulnerability. The above commands make sure only root user can read and write to the file.

Step #4: Set up a Linux swap area

Type the following command to set up a Linux swap area in a file:
# mkswap /swapfile1
Sample outputs:

Setting up swapspace version 1, size = 524284 KiB
no label, UUID=0e5e7c60-bbba-4089-a76c-2bb29c0f0839

Step #5: Enabling the swap file

Finally, activate /swapfile1 swap space immediately, enter:
# swapon /swapfile1

Step #6: Update /etc/fstab file

To activate /swapfile1 after Linux system reboot, add entry to /etc/fstab file. Open this file using a text editor such as vi:
# vi /etc/fstab
Append the following line:
/swapfile1 none swap sw 0 0
Save and close the file. Next time Linux comes up after reboot, it enables the new swap file for you automatically.

How do I verify swap is activated or not?

Simply use the free command:
$ free -m

             total       used       free     shared    buffers     cached
Mem:          1876       1798         77          0        119       1440
-/+ buffers/cache:        237       1638
Swap:         4607          0       4607

How can I display swap usage summary on Linux?

Type the following swapon command:
# swapon -s
Sample outputs:

Filename				Type		Size	Used	Priority
/dev/sda6                               partition	4194296	0	0
/swapfile1                              file		524280	0	-1

Another option is to view /proc/meminfo file:
$ less /proc/meminfo
$ grep -i --color swap /proc/meminfo

Sample outputs:

SwapCached:        30748 kB
SwapTotal:       6291448 kB
SwapFree:        6154008 kB

You can also use top command, atop command, and/or htop command to display information about swap usage:
# top
# atop
# htop

Sample outputs from a database server running on a CentOS Linux server:

  1  [||                        3.9%]     Tasks: 171, 106 thr; 1 running
  2  [                          0.0%]     Load average: 0.06 0.12 0.09 
  3  [||                        2.0%]     Uptime: 22 days, 07:07:28
  4  [                          0.0%]
  5  [                          0.0%]
  6  [                          0.0%]
  7  [                          0.0%]
  8  [                          0.0%]
  Mem[||||||||||||||||||2112/11909MB]
  Swp[|                   134/6143MB]

  PID USER      PRI  NI  VIRT   RES   SHR S CPU% MEM%   TIME+  Command
 8523 mysql      20   0 4545M  414M  4816 S  0.0  3.5  0:00.00 /usr/libexec/mysq
 8524 mysql      20   0 4545M  414M  4816 S  0.0  3.5  0:02.74 /usr/libexec/mysq
 8525 mysql      20   0 4545M  414M  4816 S  0.0  3.5  0:16.17 /usr/libexec/mysq
 8526 mysql      20   0 4545M  414M  4816 S  0.0  3.5  0:06.33 /usr/libexec/mysq
 8528 mysql      20   0 4545M  414M  4816 S  0.0  3.5  4:02.14 /usr/libexec/mysq
 8529 mysql      20   0 4545M  414M  4816 S  0.0  3.5  5:22.00 /usr/libexec/mysq
 8530 mysql      20   0 4545M  414M  4816 S  0.0  3.5  0:04.63 /usr/libexec/mysq
 8531 mysql      20   0 4545M  414M  4816 S  0.0  3.5  0:50.95 /usr/libexec/mysq
 8532 mysql      20   0 4545M  414M  4816 S  0.0  3.5  0:08.10 /usr/libexec/mysq
 9359 mysql      20   0 4545M  414M  4816 S  0.0  3.5 22:53.28 /usr/libexec/mysq

How can I disable devices and files for paging and swapping on Linux?

You need to use the swapoff command:
# swapoff /swapfile1
# swapon -s

How do I set swappiness on a Linux server?

The syntax is:
# sysctl vm.swappiness=VALUE
# sysctl vm.swappiness=20

OR
# echo VALUE > /proc/sys/vm/swappiness
# echo 30 > /proc/sys/vm/swappiness

The value in /proc/sys/vm/swappiness file controls how aggressively the kernel will swap memory pages. Higher values increase agressiveness, lower values descrease aggressiveness. The default value is 60. To make changes permanent add the following line to /etc/sysctl.conf:

echo 'vm.swappiness=30' >> /etc/sysctl.conf

Linux抗ddos内核优化

net.ipv4.tcp_syn_retries = 2
net.ipv4.tcp_synack_retries = 1
net.ipv4.tcp_keepalive_time = 600
net.ipv4.tcp_keepalive_probes = 3
net.ipv4.tcp_keepalive_intvl =15
net.ipv4.tcp_retries2 = 5
net.ipv4.tcp_fin_timeout = 2
net.ipv4.tcp_max_tw_buckets = 36000
net.ipv4.tcp_max_orphans = 32768
net.ipv4.tcp_syncookies = 1
net.ipv4.tcp_max_syn_backlog = 16384
net.ipv4.tcp_wmem = 8192 131072 16777216
net.ipv4.tcp_rmem = 32768 131072 16777216
net.ipv4.tcp_mem = 786432 1048576 1572864
net.ipv4.ip_local_port_range = 1024 65000
#net.ipv4.ip_conntrack_max = 65536
#net.ipv4.netfilter.ip_conntrack_max=65536
#net.ipv4.netfilter.ip_conntrack_tcp_timeout_established=180
net.core.somaxconn = 16384
net.core.netdev_max_backlog = 16384
 
vm.swappiness=10
net.ipv4.neigh.default.gc_stale_time=120
net.ipv4.conf.default.rp_filter=0
net.ipv4.conf.all.rp_filter=0
net.ipv4.conf.all.arp_announce=2
net.ipv4.conf.lo.arp_announce=2


Install Webmin on AWS Amazon Linux 2

https://coffieldweb.com/weblog/2019/09/04/install-webmin-aws-amazon-linux-2/

Install Webmin on Amazon Linux 2

Today we’re going to install one of our favorite Linux management tools. Webmin has been around for a very long time and is great if you’re not a command-line guru. Or perhaps you just prefer a nice GUI to look at. Webmin has a great documentation wiki here.

So let’s get started.

First, we’re going to install the repository so Yum can find it. We’re going to create a .repo file and fill it using vim.


sudo vim /etc/yum.repos.d/webmin.repo

Now lets add the Webmin settings in the file.


[Webmin]
name=Webmin Distribution Neutral
#baseurl=http://download.webmin.com/download/yum
mirrorlist=http://download.webmin.com/download/yum/mirrorlist
enabled=1

Save the file. Now Let’s go get the GPG key so Yum can validate the authenticity of the package.


wget http://www.webmin.com/jcameron-key.asc
sudo rpm -import jcameron-key.asc

OK now that we can the reference to the repo installed and the GPG key imported, we’ll simply use Yum to install Webmin. It’ll take care of all the dependencies.


sudo yum install webmin

Once that’s done, Webmin will be running and serving on port 10000. You’ll want to adjust your security group in EC2 to make sure port 10000 is open. Also by default, Webmin serves secure pages using https. Most servers don’t have a domain-specific SSL cert installed at this point, so it’ll default to a self-signed certificate. Chrome and other browsers will complain about this. We’ll go over installing SSL certificates another day. For now, just accept the warning and continue to https://you_ip_address:10000/.

The last thing you’ll need to do is set the Webmin root password. By default, it tries to use the system root password which you don’t have access to. But no worries. We can force a password for the Webmin root user only. We can set up other users in Webmin btw. Let’s change the password for root now


sudo /usr/libexec/webmin/changepass.pl /etc/webmin root New_Root_password


#to restart webmin
sudo /etc/init.d/webmin restart

We’re all set and can now use Webmin in EC2 on Amazon Linux 2.

install csf

https://download.configserver.com/csf/install.txt

###############################################################################
# Copyright 2006-2018, Way to the Web Limited
# URL: http://www.configserver.com
# Email: [email protected]
###############################################################################


Installation
============
Installation is quite straightforward:

cd /usr/src
rm -fv csf.tgz
wget https://download.configserver.com/csf.tgz
tar -xzf csf.tgz
cd csf
sh install.sh

Next, test whether you have the required iptables modules:

perl /usr/local/csf/bin/csftest.pl

Don't worry if you cannot run all the features, so long as the script doesn't
report any FATAL errors

You should not run any other iptables firewall configuration script. For
example, if you previously used APF+BFD you can remove the combination (which
you will need to do if you have them installed otherwise they will conflict):

sh /usr/local/csf/bin/remove_apf_bfd.sh

That's it. You can then configure csf and lfd by reading the documentation and
configuration files in /etc/csf/csf.conf and /etc/csf/readme.txt directly or
through the csf User Interface.

csf installation for cPanel and DirectAdmin is preconfigured to work on those
servers with all the standard ports open.

csf auto-configures your SSH port on installation where it's running on a non-
standard port.

csf auto-whitelists your connected IP address where possible on installation.

You should ensure that kernel logging daemon (klogd) is enabled. Typically, VPS
servers running RedHat/CentOS v5 have this disabled and you should check
/etc/init.d/syslog and make sure that any klogd lines are not commented out. If
you change the file, remember to restart syslog.

See the csf.conf and readme.txt files for more information.

Perl Modules
============

While most should be installed on a standard perl installation the following
may need to be installed manually:

# On rpm based systems:
yum install perl-libwww-perl.noarch perl-LWP-Protocol-https.noarch perl-GDGraph

# On APT based systems:
apt-get install libwww-perl liblwp-protocol-https-perl libgd-graph-perl

# Via cpan:
perl -MCPAN -eshell
cpan> install LWP LWP::Protocol::https GD::Graph


InterWorx
=========

1. Enable csf in InterWorx > NodeWorx > Plugins > csf

2. See the InterWorx section in /etc/csf/readme.txt


Webmin Module Installation/Upgrade
==================================

To install or upgrade the csf webmin module:

Install csf as above
Install the csf webmin module in:
  Webmin > Webmin Configuration > Webmin Modules >
  From local file > /usr/local/csf/csfwebmin.tgz > Install Module


Uninstallation
==============
Removing csf and lfd is even more simple:

cd /etc/csf
sh uninstall.sh

Basic DoS/DDoS Mitigation with the CSF Firewall

https://www.liquidweb.com/kb/basic-dosddos-mitigation-with-the-csf-firewall/

Denial of Service (DoS) and Distributed Denial of Service (DDoS) attacks are common threats that every publicly accessible web server faces. The purpose of such attacks, in simplest terms, is to flood a server with connections, overloading it and preventing from accepting legitimate traffic.

Attacks increasingly have become automated instead of directly targeted and botnets (networks of infected computers that can be remotely controlled) continue to grow at a rapid pace, making DoS and DDoS attacks much more common.

Fortunately, CSF can be used to help mitigate small attacks.

Before proceeding, it is important to understand the following points:

  1. There is no way to prevent a DoS/DDoS attack against any server connected to the Internet; once in progress, the only thing that can be done is to try to mitigate its effects.
  2. There is no way to make a server respond normally when it is under attack; the most that can be done is to try to keep it online during the attack by reducing the impact of the incoming traffic.
  3. In some cases, the best way to deal with a large-volume attack is to null-route the server’s IP address. Effectively, that means temporarily taking it offline until the incoming traffic subsides.
  4. Any measures employed within CSF will be effective only against small attacks, and measures should be implemented in CSF only while the server is under attack. The firewall settings always should be restored afterward to minimize disruption of legitimate traffic, as the measures outlined below will slow incoming packets.
  5. CSF is not the only way to mitigate small-scale attacks. Services such as those offered by CloudFlare’s network also may help because they are external, buffering traffic to the server. And for maximum protection against large attacks (millions of incoming packets per second), a specialized DoS mitigation service may be necessary. You can read more about such protection at https://www.liquidweb.com/services/network/ddos.html.

Pre-Flight Check

  • This series assumes you have the ConfigServer Firewall (CSF) installed on your cPanel server, and you have access to WebHost Manager (WHM).
  • If your managed cPanel server currently uses APF but you’d prefer CSF, contact Heroic Support® and request a switch. There is no charge, it typically takes only a few minutes, and the only service that needs to be restarted as a result is the firewall itself. Our support technicians also can port your existing APF rules to CSF. If requesting an upgrade, please be sure to indicate whether your server uses the Guardian backup service so that its rules also can be configured.

If you have not already done so, be sure to first back up the current firewall configuration (Part One: How to Back up and Restore the Firewall Configuration) before making any changes. After the attack has subsided, you will want to restore the current firewall configuration using the instructions in that article.

Step #1: Open the Firewall Configuration

  1. In WebHost Manager, locate and select ConfigServer Security & Firewall under the Plugins section in the left menu. You also can begin typing “fire” into the search field at the top left to narrow down the options.
  2. Click on the Firewall Configuration button to open the configuration file.

Step #2: Rate Limit Incoming Traffic

The first thing that can be done to mitigate the effects of an incoming attack is to limit the number of connections per IP address.

When properly configured, CSF will track the number of connections from IP address hitting the server and block IP addresses at the firewall level should they exceed a defined limit.

It’s important not to set the limit too low, as protocols such as FTP, IMAP, and even HTTP all legitimately make multiple connections. Also, remember that most companies as well as homes and public hotspots may have many different computers on their internal network which all share a single public IP address.

  1. To set the limit on connections per IP address, scroll down to the Connection Tracking section of the Firewall Configuration page and set CT_LIMIT to the desired value.
    Connection tracking limit
    For the purposes of this tutorial, we’ll be using 150 connections per IP address as an upper limit. You may find that you need to lower or raise that number but, generally, you should never attempt to set it below about 100.
  2. Assuming the server is under attack, you also will want to disable email alerts by setting CT_EMAIL_ALERT to “0”. Otherwise, the server will send an email every time it blocks an IP address, which will only add to load on the server.
    Disable email alerts when enabling connection tracking
  3. You also may wish to restrict rate limiting to specific ports, which can be done using the CT_PORTS setting. Multiple ports can be added in comma-separated format (with no space in between). In this example, we’re applying rate limiting only to HTTP ports:
    Limit connection tracking to specific ports

With these settings, any IP address that makes more than 150 connections to the web site on the standard and/or secure ports will be blocked in the firewall. By default, that will be a temporary block for 30 minutes. The CT_BLOCK_TIME setting can extend the block period, and by toggling the CT_PERMANENT setting you can arrange for the IP addresses to be blocked permanently.

Step #3: SYNflood Protection

A SYNflood attack is a DoS attack exploiting the TCP (Transmission Control Protocol) connection process itself.

In basic terms, a TCP connection is established using a three-way handshake:

  • The client (incoming connection) sends a synchronization packet (SYN) to the server.
  • The server responds with a synchronization acknowledgement (SYN/ACK) to the client.
  • The client then responds with an acknowledgement (ACK) back to the server.

A SYNflood attack manipulates that three-way handshake by initiating multiple synchronization requests and then refusing to respond with any final acknowledgements. That causes the server, which is keeping a spot open waiting on the client’s final reply to complete their incoming connection, to eventually run out of available connections for the targeted service and appear to be offline.

On a Linux server, you can quickly check for SYN packets by running this command over SSH:
netstat -nap | grep SYN -c
It’s important to note that the presence of SYN packets does not necessarily mean that a server actually is under SYNflood attack. For instance, if load on the server already is high or there is a great deal of incoming traffic, an elevated level is to be expected. Only the presence of a large number (in the hundreds) is likely to be indicative of a possible SYNflood attack.

If you know that the server is under attack, you can configure CSF to help mitigate this type of attack. Otherwise, skip to Step Three and restart the firewall to apply the rate limits you enabled in Step One.

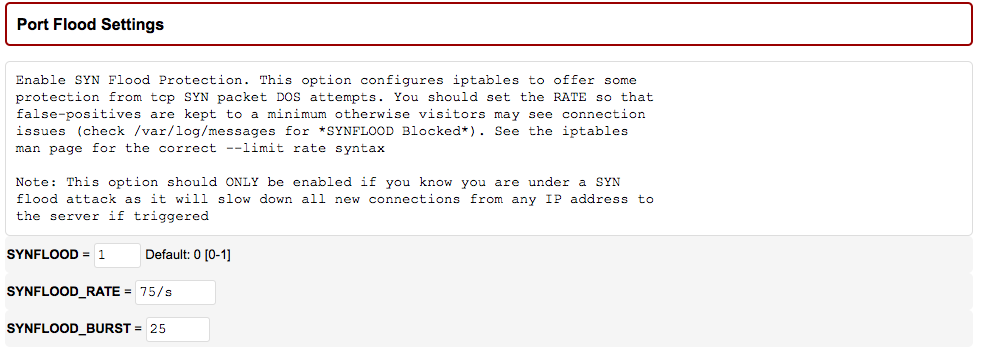
  1. To enable SYNflood protection, locate the Port Flood Settings section of the Firewall Configuration page.
    Port Flood settings
  2. You can enable SYNflood protection by setting SYNFLOOD to “1” and setting the maximum rate and burst:
    • SYNFLOOD_RATE is the number of SYN packets to accept per IP, per second. For the purposes of this tutorial, we’ll be using a value of “75/s” on the assumption that a DoS attack is in progress.
    • SYNFLOOD_BURST is the number of times the IP can hit the rate limit before being blocked in the firewall. A setting of 25 works for our purposes.

You likely will need to raise or lower these settings based on your circumstances. However, a setting above about 100/s for the rate (or 150 for the burst) could be too generous to be effective; Likewise, lowering the rate below about 50/s (or the burst below about 50) could prevent legitimate access to services.

Step #3: Save Your Changes and Restart the Firewall

  1. Scroll to the bottom of the Firewall Configuration page and click on the Change button.
  2. On the next screen, click the Restart csf+lfd button to restart the firewall with the new settings.

Next Steps

  1. Once the attack has subsided, you will need to restore the firewall’s previous configuration to avoid disruption of legitimate incoming traffic. If these “under attack” rules are left in place, the added packet scrutiny at the firewall level will slow traffic considerably and can lead to noticeably diminished web server performance.
  2. If you followed the instructions in Part One: How to Back up and Restore the Firewall Configuration to back up the previous configuration, you can easily use the same process to restore those saved settings. You also may wish to save these DoS/DDoS protection settings before restoring the original configuration so that they can be quickly employed in the future if necessary.

Haproxy配置抗ddos

https://www.haproxy.com/blog/application-layer-ddos-attack-protection-with-haproxy/

Protecting TCP (non-HTTP) Services

So far, we’ve primarily covered protecting web servers. However, HAProxy can also help in protecting other TCP-based services such as SSH, SMTP, and FTP. The first step is to set up a stick-table that tracks conn_cur and conn_rate:

frontend per_ip_connections
    stick-table type ip size 1m expire 1m store conn_cur,conn_rate(1m)

Next, create or modify a frontend to use this table by adding track and reject rules:

frontend fe_smtp
    mode tcp
    bind :25
    option tcplog
    timeout client 1m
    tcp-request content track-sc0 src table per_ip_connections
    tcp-request content reject if { sc_conn_cur(0) gt 1 } || { sc_conn_rate(0) gt 5 }
    default_backend be_smtp

With the usual backend:

backend be_smtp
    mode tcp
    timeout server 1m
    option tcp-check #For SMTP specifically smtpchk can be used
    server smtp1 162.216.18.221:25 maxconn 50 check

Now, each client can establish one SMTP connection at a time. If they try to open a second one while the first is still open, the connection will be immediately closed again.

msfdb启动报错”Attempting to start MSF web service…failed”解决方法

1.查看~/.msf4/msf-ws.log,如果是

dyld: lazy symbol binding failed: Symbol not found: _SSL_library_init
Referenced from: /Users/xxxx/.rbenv/versions/2.6.5/lib/ruby/gems/2.6.0/gems/eventmachine-1.2.7/lib/rubyeventmachine.bundle
Expected in: flat namespace

手动指定ssl包含文件路径并重新安装eventmachine

gem uninstall eventmachine
gem install eventmachine -v '1.2.7' -- --with-cppflags=-I$(brew --prefix openssl)/include

2.再次启动msfdb,发现报错

objc[4443]: +[__NSCFConstantString initialize] may have been in progress in another thread when fork() was called.
objc[4443]: +[__NSCFConstantString initialize] may have been in progress in another thread when fork() was called. We cannot safely call it or ignore it in the fork() child process. Crashing instead. Set a breakpoint on objc_initializeAfterForkError to debug.

这是macOS对objc多线程的限制,修改环境变量解决问题

export OBJC_DISABLE_INITIALIZE_FORK_SAFETY=YES


Copying an operating system image to an SD card using Mac OS

https://www.raspberrypi.org/documentation/installation/installing-images/mac.md

Note: The use of the dd tool can overwrite any partition of your machine. If you specify the wrong device in the instructions, you could overwrite your primary Mac OS partition!

Determine SD device

  • Insert the SD card in the slot or connect the SD card reader with the SD card inside.
  • diskutil list

    or

  • From the Apple menu, choose ‘System Report’, then click on ‘More info…’.
  • Click on ‘USB’ (or ‘Card Reader’ if you are using a built-in SD card reader), then search for your SD card in the upper right section of the window. Click on it, then search for the BSD name in the lower right section. It is in the form diskN (for example, disk4). Record this name.
  • using Disk Utility, unmount the partition. Do not eject it.

Copy the image

  • From Terminal, enter:
    sudo dd bs=1m if=path_of_your_image.img of=/dev/rdiskN conv=sync

    Replace N with the number that you noted before.

    This can take more than 15 minutes, depending on the image file size. Check the progress by pressing Ctrl+T.

    If the command reports dd: bs: illegal numeric value, change the block size bs=1m to bs=1M.

    If the command reports dd: /dev/rdisk2: Operation not permitted you need to disable SIP before continuing.

    If the command reports the error dd: /dev/rdisk3: Permission denied, the partition table of the SD card is being protected against being overwritten by Mac OS. Erase the SD card’s partition table using this command:

    sudo diskutil partitionDisk /dev/diskN 1 MBR "Free Space" "%noformat%" 100%

    That command will also set the permissions on the device to allow writing. Now issue the dd command again.

After the dd command finishes, eject the card:

sudo diskutil eject /dev/rdiskN

使用aws-cli更新lightsail mysql时区

https://forums.aws.amazon.com/thread.jspa?threadID=307496

https://lightsail.aws.amazon.com/ls/docs/en_us/articles/amazon-lightsail-updating-database-parameters

1.通过get-relational-database-parameters查询可用参数

aws lightsail get-relational-database-parameters --relational-database-name DatabaseName

2.通过update-relational-database-parameters更新参数

aws lightsail update-relational-database-parameters --relational-database-name xxxx --parameters "parameterName=time_zone,applyMethod=pending-reboot,parameterValue=Asia/Shanghai"


svn服务脚本

#!/bin/sh
if [ true != "$INIT_D_SCRIPT_SOURCED" ] ; then
    set "$0" "$@"; INIT_D_SCRIPT_SOURCED=true . /lib/init/init-d-script
fi
### BEGIN INIT INFO
# Provides:          svnserve
# Required-Start:    $remote_fs $syslog
# Required-Stop:     $remote_fs $syslog
# Default-Start:     2 3 4 5
# Default-Stop:      0 1 6
# Short-Description: svnserve init script
# Description:       bare minimum svn init script
### END INIT INFO
DESC="subversion server"
DAEMON=/usr/bin/svnserve
DAEMON_ARGS="-d -r /data/svn --log-file /var/log/svn.log"
sudo chmod 755 /etc/init.d/svnserve
sudo update-rc.d svnserve defaults
sudo systemctl enable svnserve
sudo systemctl daemon-reload